 .
.Information about dimensions based
on SAP BW metadata appears in a different topic  .
.
A dimension is a broad grouping of data about a major aspect of a business, such as products, dates, or markets.
The types of dimensions that you can work with in Framework Manager are regular dimensions and measure dimensions. In SAP BW, measure dimensions are called key figures.
For example, in a project for sales analysis, you include these dimensions:
Name | Type | Description |
Time | Regular dimension | Dates of sales organized into years, quarters, months, weeks, and days when sales were made |
Region | Regular dimension | Locations of sales grouped into sales regions, countries, and cities |
Product | Regular dimension | Product details organized by product type, brand, model, color, and packaging |
Customer | Regular dimension | Customer information |
Sales | Measure dimension | Purchase details such as units sold, revenue, and profit |
You must use regular and measure dimensions to enable analysis on your relational data source. In most data sources, measure dimensions are likely to be shared by more than one regular dimension. Regular dimensions are often called shared dimensions. A measure dimension and regular dimensions organized into a cluster is often referred to as a star schema group but can also be referred to as a functional or subject area group.
You may also be interested in this topic, Query Subjects vs. Dimensions.
Normalized or snowflaked data sources often have several tables that describe a single business concept. For example, a normalized representation of Product may include four tables related by 1..n relationships. Each Product Line has one or more Product Types. Each Product Type has one or more Products. Products have names and descriptions in multiple languages so they exist in the Product Multilingual lookup table.
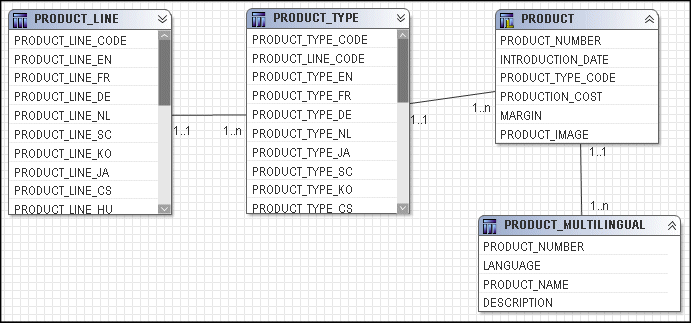
You may be interested in the following related topics:
Information about modifying a regular
dimension for SAP BW metadata appears in a different topic  .
.
A regular dimension contains descriptive and business key information and organizes the information in a hierarchy, from the highest level of granularity to the lowest. It usually has multiple levels and each level requires a key and a caption. If you do not have a single key for your level, it is recommended that you create one in a calculation.
Model regular dimensions are based on data source or model query subjects that are already defined in the model. You must define a business key and a string type caption for each level. When you verify the model, the absence of business keys and caption information is detected. Instead of joining model regular dimensions to measure dimensions, create joins on the underlying query subjects and create a scope relationship between the regular dimension and the measure dimension.
When creating regular dimensions, you must understand the dimensionality of the data. You must be able to answer the following questions:
What are the levels in your dimension?
What is the order and combination of levels that form hierarchies?
What are the relationships between the levels?
What uniquely identifies a level?
Which data elements are associated at each level?
Do you have more than one level of granularity, such as some data is recorded monthly and some is recorded daily?
Are foreign keys defined in the data source?
You can specify multiple hierarchies on regular dimensions in Framework Manager. Multiple hierarchies for a regular dimension behave as views of the same query. However, you can use only one hierarchy at a time in a query. For example, you cannot use one hierarchy in the rows of a crosstab report and another hierarchy from the same dimension in the columns. If you need both hierarchies in the same report, you must create two dimensions, one for each hierarchy. For more information, see Modeling Dimensions with Multiple Hierarchies.
In addition to creating regular dimensions, you can also merge dimensions into a single dimension or convert query subjects to dimensions.
Multiple-fact querying is enabled with conformed dimensions.
While you can use data source dimensions, they have limited functionality in comparison to query subjects or model dimensions. It is recommended that you discontinue using data source dimensions (both regular and measure). Create new models following the recommendations in Guidelines for Modeling Metadata to use query subjects as the relational foundation of the model. Define regular and measure dimensions as model objects based on data source query subjects or model query subjects or both. Guidance on migration for existing users of data source dimensions will be provided in a future release.
Select a namespace or folder where you want to place the dimension.
From the Actions menu, click Create, Regular Dimension, and then click the Dimension tab.
Click the Dimension tab.
Click Add Hierarchy and then drag one or more objects from the Available items box to the Hierarchies box.
You can define multiple hierarchies for a dimension. The first hierarchy is used as the default, or primary, hierarchy.
You can also create an alternate hierarchy by copying a level. Click a level and drag it to the right border of the dimension. You can only copy a level within the same dimension.
Click Add Level and then drag one or more objects from the Available items box into the new level.
You can also create copies of levels in the Dimension Definition dialog box or in the Dimension Map tab. Click the level and drag it to another position in the hierarchy. All attributes of the level are also copied. You can only copy a level within the same dimension.
If you want to use a different item in a level, drag it from the Available items box to the Select a level in the hierarchy control to see the query items box.
You are prompted to specify its role.
By default, Framework Manager adds the name of the namespace.
Tip: To have a multiple-part key such as first name plus last name, create a new attribute that combines the items, and then specify that the new attribute is the business key.
If you want to indicate that the keys of the levels above the current level are not necessary to identify the members in this level, select the item and select the Unique Level check box.
Do this only if the key values are unique regardless of their context, such as postal code values.
Choose the additional tasks that you want to perform:
Click OK.
To change the default hierarchy for a dimension with multiple hierarchies, do the following:
In the Properties pane, click the ellipsis (...) button in the Default Hierarchy box.
Select a different hierarchy, and click OK.
You can also use the Dimension Map tab
to create a regular dimension. Click the regular dimension button  .
.
Information about hierarchies for
SAP BW metadata appears in different topics  and
and  .
.
A hierarchy is an ordered list of levels or a collection of items. Each query item in a hierarchy must have a unique name.
You can specify multiple hierarchies on regular dimensions in Framework Manager. Multiple hierarchies for a regular dimension behave as views of the same query. The first hierarchy is the primary or default hierarchy.
You can use only one hierarchy at a time in a query. For example, you cannot use one hierarchy in the rows of a crosstab report and another hierarchy from the same dimension in the columns. If you need both hierarchies in the same report, you must create two dimensions, one for each hierarchy. For more information, see Modeling Dimensions with Multiple Hierarchies.
For example, sales staff can be viewed by manager or by sales branch and can be modeled as a single dimension with two hierarchies.
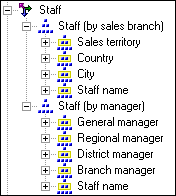
If you need both hierarchies in the same report query, such as on opposing axes, you must create a regular dimension for each hierarchy. For example, here is sales staff as two dimensions.
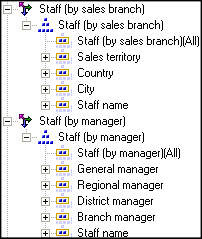
Tip: To change the default hierarchy for a dimension with multiple hierarchies, in the Properties pane, click the ellipsis (...) button in the Default Hierarchy box, and select a different hierarchy.
If a hierarchy in a dimension contains a large number of members, running a query in one of the Cognos 8 studios may be slow because the Cognos 8 engine is generating one large query for a locally-built cube. To resolve this issue, set the Wide Member Tree property in the Properties pane to true. The engine will then generate multiple smaller queries for the locally-built cube.
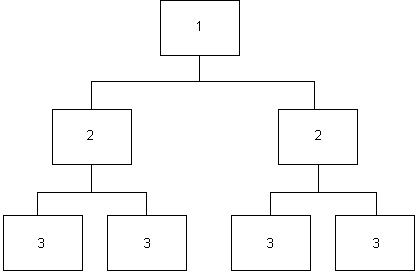
Each path in a balanced hierarchy descends to the same depth.
For example, in the following diagram, the highest level is Product Line. Level 2 is Product Type. Level 3 is Products.
The branches in an unbalanced hierarchy descend to different levels.
For example, in the following diagram, the highest level in an organization is the CEO. Level 2 is the vice-presidents and the CEO’s executive assistant. The executive assistant does not have subordinates although the vice-presidents do.
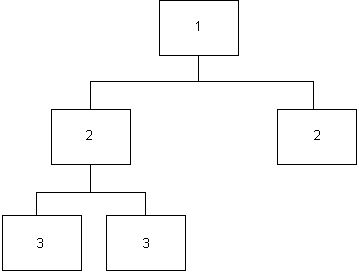
An unbalanced hierarchy can also be ragged. In a ragged-unbalanced hierarchy, there are gaps in the levels and the levels descend to different depths.
For relational metadata, we recommend that ragged hierarchies and network hierarchies be flattened in the data source.
The simplest definition of a level consists of a business key and a caption, each of these referring to one query item. An instance (or row) of a level is defined as a member of that level. It is identified by a member unique name, which contains the values of the business keys of the current and higher levels. For example, [gosales].[Products].[ProductsOrg].[Product]->[All Products].[1].[1].[2] identifies a member that is on the fourth level, Product, of the hierarchy ProductsOrg of the dimension [Products] that is in the namespace [gosales]. The caption for this product is TrailChef Canteen, which is the name shown in the metadata tree and on the report.
The first level of the hierarchy is automatically defined as the All level. It contains a single root member, which represents the top level of the hierarchy. For example, the All level for the Time dimension is named Time (All). You cannot delete or move the All level. You can change its name, description, and screen tip.
If you do not specify the levels of the hierarchy correctly, incorrect aggregation could occur.
The member unique name (MUN) is how the member is found in the data source, much like using business keys to find records in a table.
The member unique name is used in the expression for a member data item that is used in a report, a reference to members in filters and expressions, and used in drill-through between OLAP data sources. The member keys in the MUN for the different OLAP data sources must match.
If a member unique name changes, members that are directly referenced in expressions, filters, or reports are no longer found because the MUN is contained in the report specification. Member unique names can change for a variety of reasons:
Changes to the hierarchy and level structures may change the level unique name.
The business key values have changed and this changed the member key path.
The application changed during design or over time.
The cube has category codes that are unpredictably unique.
The production environment has more members than the test environment.
The member no longer exists in the data source.
To avoid these problems, we recommend the following practices:
Use unique codes and keys within a dimension for the member keys.
Use unique conformed values for similar dimensions between the target and source environments when enabling drill through.
When using a dimensionally model relational model for drill-through, ensure the root business key conforms with the root members of the other data sources.
Ensure that the business keys and dimension metadata structure are the same between the production and test environments.
Do not change the business keys in Framework Manager after going into production.
Resolve the non-unique keys within a dimension in the data source. Tildes are not recommended in the category codes.
If you have a Transformer cube that is built with non-unique source values, do not use the Clean House feature in Transformer because it will most likely change the category codes. We recommend that you keep a backup copy of your MDL file.
A key is a query item that uniquely identifies members in a level. For example, Product Number uniquely identifies a product while City, State, and Country are all needed to uniquely identify a city. The key may or may not be contained in a level. Foreign keys are used to relate the measure dimension to its regular dimensions.
Each level needs an item that is defined as a key.
If a model dimension contains a query item whose data type is BLOB, create a query subject that has determinants and then create a model dimension that is based on the model query subject.
Information about roles for SAP BW metadata
appears in a different topic  .
.
Roles define what appears in the member tree in the Cognos 8 studios. Use roles to organize and manage metadata and to determine how to present data to your users.
You can also create expressions that refer to roles instead of query items. You must use the roleValue function to refer to a particular role. For example, you want to query against a specific role in a hierarchy but the query item playing that role is different at each level of the hierarchy. A single query can span the different query items at each level. You can also use the roleValue function when you know the role but not the underlying query item.
You can assign multiple roles to one query item, but the same role cannot be assigned to different query items in the same level.
Default roles are pre-defined for all parent-child hierarchies and for all levels in level-based hierarchies. Most of these roles are not visible in the Cognos 8 studios.
The roles that are reserved by Cognos 8 start with an underscore. The name for a custom role cannot start with an underscore.
The default roles include the following:
_businessKey
Represents the key for the level. The level can be defined as unique if the business key of the level is sufficient to identify each set of data for a level.
The _businessKey role can be assigned to only one attribute in a level.
The Root Business Key property shows the value of the business key for the root member. The root member is an artificial level created for dimensionally modeled relational models. To enable drill-through on conforming dimensions, you must set the Root Business Key property.
_memberCaption
Presents the caption for a member that will be shown in the Cognos 8 studios.
The _memberCaption role is necessary to leverage member functions and to enable dragging and dropping levels in the Cognos 8 studios.
Ensure that the data type is set to string for the item that will be assigned the _memberCaption role.
_memberDescription
Returns the description for a member within a dimension.
By default, attributes are included with no role. You can assign attributes to existing roles or you can create custom roles. Each role that you create must have a unique name.
You can translate the custom roles in the model.
Roles define what appears in the member tree in the Cognos 8 studios. Use roles to organize and manage metadata and to determine how to present data to your users.
Click the dimension whose roles you want to define.
From the Actions menu, click Edit Definition.
Click the Dimension tab.
In the Hierarchies box, click the level you want.
In the Select a level in the hierarchy control to see the query items box, click a query item.
Under Role, click the ellipsis (...) button.
Do one of the following:
To use a role defined by Framework Manager, click the Default Roles tab, and select a role.
To create a role, click the Custom Roles tab, and click Add.
Click Close.
Click OK.
You can also use the Dimension Map tab to define roles. Click Attributes, right-click the query item, and click Edit Roles.
Information about modifying a key
figures dimension for SAP BW metadata appears in a different topic  .
.
A measure dimension is a collection of facts. You can create a measure dimension for one or more query subjects that have a valid relationship between them.
Model measure dimensions should be composed of only quantitative items. Because, by design, model measure dimensions do not contain keys on which to join, it is not possible to create joins to model measure dimensions. Instead of joining model measure dimensions to regular dimensions, create joins on the underlying query subjects. Then either manually create a scope relationship between them or detect scope if both dimensions are in the same namespace.
Only measures are visible in the model measure dimension. Query items, such as keys, are hidden.
While you can use data source dimensions, they have limited functionality in comparison to query subjects or model dimensions. It is recommended that you discontinue using data source dimensions (both regular and measure). Create new models following the recommendations in Guidelines for Modeling Metadata to use query subjects as the relational foundation of the model. Define regular and measure dimensions as model objects based on data source query subjects or model query subjects or both. Guidance on migration for existing users of data source dimensions will be provided in a future release.
You can add value by embedding calculations based on existing business rules, such as Profit Margin.
You can change the order of measures, query items, and calculations.
If the measure dimension contains a folder, you can change the order only in the Project Viewer.
You cannot define hierarchies or levels for a measure dimension.
Click a namespace where you want to place the measure dimension.
From the Actions menu, click Create, Measure Dimension.
Click the Measure Dimension tab.
Drag measures from the Model Objects box to the Measures box.
Perform the actions that you want.
Goal | Action |
Embed a calculation | Click Add. You can also right-click a measure and click Add or Edit. |
Embed a filter | Click the Filters tab. |
Test the measure dimension | Click the Test tab. |
Convert a measure into a query item | Right-click the measure and click Convert to Query Item. |
Note: If you test the measure dimension by using the Query Information tab, Cognos 8 validates the measure dimension. If you test the measure dimension by using the Test tab, Cognos 8 executes the measure dimension. The SQL for validate is slightly different than the SQL for execute. To generate definitive SQL for the measure dimension, use the Test tab.
Click OK.
You can also use the Dimension Map tab
to create a measure dimension. Click the measure dimension button  .
.
You may be interested in the following related topics:
If you have created a measure dimension and want to join it to regular dimensions, you need to create joins. Joins need keys and keys are query items, not measures. The measure that you want to use as a key must be converted into a query item.
You can also convert a query item into a measure  .
.
Double-click the measure dimension that contains the measure.
Click the Measure Dimension tab.
Right-click the measure and click Convert to Query Item.
Click OK.
Scope relationships are necessary to define which dimensions and measures are used together for dimensionally modeled relational models.
Scope relationships exist only between measure dimensions and regular dimensions to define the level at which the measures are available for reporting. They are not the same as joins and do not impact the Where clause. There are no conditions or criteria set in a scope relationship to govern how a query is formed, it specifies only if a dimension can be queried with a specified fact. The absence of a scope relationship results in an error at runtime.
If you set the scope relationship for the measure dimension, the same settings apply to all measures in the measure dimension. If data is reported at a different level for the measures in the measure dimension, you can set scope on a measure. You can specify the lowest level that the data can be reported on.
When you create a measure dimension, Framework Manager creates a scope relationship between the measure dimension and each existing regular dimension. Framework Manager looks for a join path between the measure dimension and the regular dimensions, starting with the lowest level of detail. If there are many join paths available, the scope relationship that Framework Manager creates may not be the one that you intended. In this case, you must edit the scope relationship.
A scope relationship is automatically generated when you drag a dimension into the dimension map or when you move a query subject into the dimension namespace and convert it to a regular dimension.
Note: Shortcuts to scope relationships are not supported.
Scope relationships exist only between measure dimensions and regular dimensions to define the level at which the measures are available for reporting.
Click the Dimension Map tab.
Tip: To view scope relationships highlighted with a background
color, click the show scope button  .
.
Click one or more measure dimensions.
Click the level of the dimension that you want to set the scope to.
Tip: If you want Framework Manager to define the scope
relationship, select the measure dimension and the regular dimension,
and click the determine scope button  .
.
Click the set scope button  .
.
If you want to remove the scope, select the hierarchy
or dimension and click the remove scope button  .
.
If you select a hierarchy, you can remove the scope from a specific hierarchy without affecting the scope set in other hierarchies of the dimension.
If you select the dimension, all scope from all hierarchies is removed. The scope relationship between the measure dimension and the regular dimension is also removed.
You can create a new regular dimension by merging existing objects. These objects can be dimensions, query subjects, or query items.
Select the objects that you want in a dimension.
From the Actions menu, click Merge in New Regular Dimension.
Information about viewing related
objects for SAP BW dimensions appears in a different topic  .
.
You can explore a visual representation of the objects that are connected to the query subject or dimension that you select in the Project Viewer. The Context Explorer shows the objects that the selected object is connected to. You can also select a connected object and see its references.
You can hide an object in the Context Explorer. You can also change the layout, fit all objects in the Context Explorer, and zoom in and out.
You can also use the Dimension Map tab to explore dimensions.
Select one or more objects that you want to explore.
From the Tools menu, click Launch Context Explorer.
To see the connected objects, click one or more objects and click the appropriate button.
Goal | Button |
View the objects that are related to the selected object. | |
View the immediate references for the objects. | |
View all references for the objects. | |
If you want to see details about an object, such as its relationships and query items, right-click the object, click Diagram Settings, and then select the details you want.
Information about testing SAP BW
metadata appears in a different topic  .
.
Testing a regular dimension returns the attributes associated with the hierarchy defined as the default.
You can see the results that an object returns by testing it. You can test when creating an object or later on. The objects you can test are dimensions, query subjects, query sets, hierarchies, levels, calculations, and query items.
You can view the data that will appear in a specific report before publishing a package by selecting and testing the objects that will appear in the report. This makes it easier to debug a model and to verify that the model meets the reporting requirements because you do not need to create and publish packages first.
When you test an object, Framework Manager returns sample data. Formatting is not applied to the sample data. If you must test formatting, you must publish the package and view the objects in the Cognos 8 studios.
You may see different results depending on what you test. For example, if you use the expression editor to test a calculation that is embedded in a query subject, Framework Manager tests only the expression, not the item, so the aggregation setting for the query item is not applied to the test. Testing the entire query subject, which includes the calculation, gives a different result because the aggregation setting is applied. For example, if the aggregation setting is summarize, you can see a smaller number of rows in the test.
If you test a child segment of a segmented model, you may see an error if an object you are testing refers to an object in another child segment and the referenced object is not available to the project you are in. We recommend that you check that the parent model contains all the objects and that this error message does not appear when you test the parent model.
Governor settings may affect the testing results. For more information, see Set Governors.
You can change existing test settings to customize the results that the test shows. For example, in addition to other settings, you can control the number of rows returned.
Select the object you want to test.
From the Actions menu, click Edit Definition, and click the Test or Query Information tab.
The Test Results box is initially empty until you run the query.
Any result sets that contain binary large objects are shown as [blob].
To run the query and bring back all the test results, click Test Sample.
If you want to add a count of the rows, click Total Rows.
If you want to apply the Regular Aggregate property of the query item or the Aggregate Rules property of a semi-additive measure that is referenced in the expression, select the Auto Sum check box.
If you clear this check box, a row is returned for each row in the result set of the query.
If you want to obtain more information about the query results, click the Query Information tab.
Click OK.
Select the objects that will appear in the report.
From the Tools menu, click Test.
A message appears, telling you if the test was successful or if problems were found.
To view details about any problem that is found, click the Query Information tab.
If you do not see the results of the query in the test window, the data from your data source may exceed the value of the Runtime Limits governor. The query stops at the specified limit, but the test result window does not contain any data. Tip: Set the Runtime Limits governor to zero.
When you test a measure dimension, the SQL uses aggregates not the measures.
You can customize the tests by changing the test settings.
Select the object that you want.
From the Actions menu, click Edit Definition and then click the Test tab or the Query Information tab.
Click Options and then click the Test Settings tab.
Choose the options that you want.
Goal | Action | Persistence |
Retrieve all data and show a specified number of rows | Select the Restrict the maximum number of rows to be returned check box and type the required number of rows. This setting does not improve performance for retrieving data when testing dimensions, query subjects, and query sets. | This setting applies to all dimensions, query subjects, and query sets in the model. This setting is saved and used in your next session with any model. |
Specify the level of detail | Drag the Level of Information shown in Results Information slider to the location that represents the amount of detail you require. | This setting is saved and used in your next session with this model. |
Temporarily override session parameters | In the Session Parameters box, click Set. The Session Parameters dialog box appears. | The override values are not saved with the model. This setting is for your current session only. |
Apply relevant design mode filters | Select the Apply all relevant design mode filters when testing check box. This applies all relevant filters whose usage is set to design mode in another dimension, query subject, or query set. | This setting is saved and used in your next session with any model. |
Apply a security filter | In the Security Filters box, click Edit. | This setting is saved and used in your next session with this model. |
Change the prompt values | In The Current Prompt Values box, click Prompts. The Model Prompts Manager dialog box appears, which shows all prompts, and their values, that are in the model. | The prompt values are not saved with the model. This setting is for your current session only. |
Click OK two times.
You may be interested in the following related topics:
You can convert a regular dimension into a model query subject or a data source query subject.
You can also convert a query subject into a dimension  .
.
If a dimension has multiple hierarchies, only the default hierarchy is included when you convert the dimension to a query subject.
Click the regular dimension.
From the Actions menu, click Convert to Query Subject.
