Customizing Cognos Connection
You can do the following to customize Cognos Connection:
Add or hide user interface elements based
on groups and roles  .
.
Hide and disable the new URL button.
Limit the number of entries that users can cut, copy, and paste .
Customize object actions .
Restrict content browsing .
Implement a custom Welcome page .
Customize report output formats in Cognos Connection and Cognos
Viewer .
Customize the document lookup table .
Add or Hide User Interface Elements Based on Groups and Roles
You can customize the Cognos Connection user interface
based on the group and role membership. Depending on the group or
role to which users belong, certain user interface elements will
or will not be available to them. For example, you can hide the
preferences and studio links from some users and add links to external
applications for other users.
To implement this functionality, perform the following tasks:
Hide user interface elements
Add user interface elements
Reference the required groups or roles in the system.xml file
Some user interface elements are shared by Cognos Connection
and Cognos Viewer, for example the top header (m1). If you hide
these shared interface elements in Cognos Connection, they are also
hidden in Cognos Viewer.
For a list of elements you can hide and add, see User Interface Elements Reference List.
Note: It is important to note that there is a difference
between hiding a UI element and disabling it. Hiding means that
the element will no longer be visible, but that the functionality
is still available. Disabling a UI element means that the element
is not visible and that the underlying functionality is no longer
available.
Hide User Interface Elements
You can use URL commands to hide user interface elements
for a session, or you can edit the system.xml file to hide user
interface elements permanently.
When you hide user interface elements in page headers, these
elements are not hidden elsewhere in Cognos 8. For example,
Report Studio can be run from the body of the Welcome page or from
the h1 header. Hiding the Cognos 8 header using the URL
command does not hide Report Studio link in the body of the Welcome
page.
Using URL
Commands
Type URL commands in your browser if you want to hide user interface
elements for the current Cognos 8 request or session only.
You can use URL commands to hide UI elements for both Cognos Connection
and Cognos Viewer.
Cognos Connection commands can only be appended to Cognos Connection
URLs, and Cognos Viewer commands can only be appended to Cognos
Viewer URLs. For example, adding &ui=t3m4 at the end
of a Cognos Viewer URL does not affect Cognos Connection.
Cognos Viewer commands do not affect the Cognos Connection user
interface. For example, adding the Cognos Viewer command &tb=0 at
the end of a Cognos Connection URL will show no effect.
However, Cognos Connection commands may affect Cognos Viewer
indirectly. For example, hiding the top header in Cognos Connection
will also hide the header in Cognos Viewer.
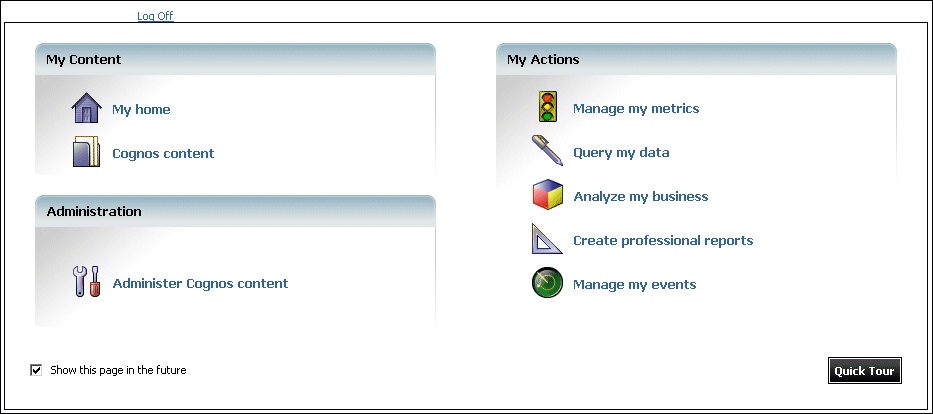
The following example shows the headers in the Cognos Connection
main page.
You can use URL commands to hide the following Cognos Connection
headers or sections of a header:
the Cognos Connection top header (h1) that
includes the title (t1), the Launch menu (m1). and all right-hand
side header options.
the tab bar (h3) that includes tabs such as Public Folders,
My Folders, and My custom page (t3).
the Cognos Connection header (h4) that includes the navigation
path (t4), and the toolbar menu (m4).
Using the System.xml
File
To hide all instances of a user interface element in Cognos Connection,
you must modify the system.xml file.
Modifying the system.xml file is more flexible than using URL
commands for these reasons:
Steps Using URL Commands in Cognos Connection
Start Cognos 8.
In Cognos Connection, click in the Web address box and
type the following at the end of the URL:
&ui=user_interface_elements_to_hide
where user_interface_elements_to_hide is one or more of t1, t4,
m1, m4, h1, h3, or h4.
For example, type:
&ui=h1m4
The hidden UI remains hidden for the rest of the user session.
To restore the hidden elements, type &ui= at
the end of the URL.
Steps Using URL Commands in Cognos Viewer When Viewing
Reports
Start Cognos 8.
In Cognos Viewer, click in the Web address box and type
on of the following at the end of the URL:
To turn off the Cognos Viewer toolbar,
type:
ui.toolbar=false
To turn off the Cognos Viewer header, type:
ui.header=false
The hidden UI remains hidden for the rest of the user request.
Steps Using the
System.xml File
Stop the Cognos 8 service.
Open the c8_location/templates/ps/portal/system.xml
file in an XML or text editor.
Use the following syntax in the <system> element
to hide a user interface element:
<param name="ui_hide">
	<!--list of user interface elements-->
</param>
For example, the following XML code hides the entire Cognos Connection
header and the New Job button in the toolbar:
<param name="ui_hide">
	<CC_HEADER/>
	<CC_TOOLBAR_BUTTONS_newjobDefinition/>
</param>
For information about all the user interface elements that you
can hide, see Elements You Can Hide. Ensure that you match the case
of each user interface element you want to hide.
Specify one or more groups or roles you want to view the
hidden element by adding their IDs as values of the show attribute.
Use the group or role IDs as documented in the topic Reference the Required Groups or Roles in the system.xml File.
Separate IDs using spaces.
Here is an example:
<param name="ui_hide">
	<CRN_HEADER show="Administrators g1 g2 RSUsers"/>
</param>
Repeat steps 3 to 4 for each element that you want to hide.
Save the file.
Start the Cognos 8 service.
Tip: There can be only one <param name="ui_hide"> element
in system.xml. Therefore, all items you want to hide must be placed
inside this element.
Add User Interface Elements
You can add user interface elements to Cognos Connection
to connect to external applications or to modify the functionality
of Cognos Connection. You can restrict the appearance of these new
user interface elements based on different types of users.
The xml:lang attribute of the label and tooltip elements
corresponds to the product locale in use at the time of the portal
page generation. If a new product locale is added to Cognos 8,
you must add a translation for the label and tooltip fields. When
no label or tooltip is found that matches the product locale, nothing
is displayed.
The graphic referenced by the icon element must
exist in the c8_location/webcontent/ps/portal/images directory.
To add a user interface element in Cognos Connection, you must
modify the system.xml file.
Steps
Stop the Cognos 8 service.
Open the c8_location/templates/ps/portal/system.xml
file in an XML or text editor.
Use the following syntax in the <system> element
to add a user interface element:
<param name="ui_add">
<!--list of user interface elements-->
</param>
For example, the following XML code adds an option to start a
Google search in a new browser window.
<param name="ui_add">
	<CRN_HEADER_OPTIONS>
		<item>
			<url>http://www.google.com</url>
			<target>_blank</target>
			<label xml:lang="en">Google</label>
			<tooltip xml:lang="en">Google</tooltip>
			<label xml:lang="fr">Google</label>
			<tooltip xml:lang="fr">Google</tooltip>
			<label xml:lang="de">Google</label>
			<tooltip xml:lang="de">Google</tooltip>
			<label xml:lang="ja">Google</label>
			<tooltip xml:lang="ja">Google</tooltip>
			<icon>action_search.gif</icon>
		</item>
	</CRN_HEADER_OPTIONS>
</param>
For information about all the user interface elements that you
can add, see Elements You Can Add. Ensure that you match the case of
each user interface element you want to add.
Specify one or more groups or roles you want to view the
new interface element by adding their IDs as values of the show attribute.
Use the IDs as documented in the topic Reference the Required Groups or Roles in the system.xml File.
Separate IDs using spaces.
Here is an example:
<param name="ui_add">
	<CC_VIEW_TOOLS>
		<item show="Administrators RSUsers g1 g2">
			<url>http://my_server_url/myApplication</url>
			<target>_blank</target>
			<label xml:lang="en">My_label in English</label>
			<label xml:lang="fr">My_label in French</label>
			<label xml:lang="de">My_label in German</label>
			<label xml:lang="ja">My_label in Japanese</label>
		</item>
	</CC_VIEW_TOOLS>
</param>
Save the file.
Restart the Cognos 8 service.
Tip: There can be only one <param name="ui_add">
element in system.xml. Therefore, all items you want to add must
be placed inside this element.
Reference the Required Groups or Roles in the system.xml
File
Before you start implementing the customization changes
in the Cognos Connection user interface, you must identify the groups
or roles on which your customizations will be based.
Add a reference about the groups or roles you want to use to
the portal system.xml file. Modify this file by adding the ui_groups parameter
and listing all required groups and roles within this parameter.
Each group or role is represented by the group element
that must contain a unique id attribute. The value
of the id attribute is specified in the group or
role search path in Cognos Connection.
Include only the groups and roles you want to use for the purpose
of hiding or adding user interface elements. The groups and roles
must already exist in Cognos 8 and can be associated with
any namespace configured for your Cognos 8 environment.
You can use the predefined groups and roles , or your custom
groups and roles .
The predefined groups and roles that can be used include:
|
Anonymous | Users who can access Cognos 8 without
being prompted for authentication | Anonymous |
Administrators | Users who have the administration capability | Administrators |
Consumers | All authenticated users, which includes
Administrators, Query Studio Users, and Report Studio Users | Consumers |
Query Studio Users | Users who have the Query Studio capability | QSUsers |
Report Studio Users | Users who have the Report Studio capability | RSUsers |
Steps
Stop the Cognos 8 service.
Open the c8_location/templates/ps/portal/system.xml
file in an XML or text editor.
Add a parameter named ui_groups and then
do the following:
Add the group element
for each group or role you want.
Specify a unique id attribute for each group
or role.
The IDs are case sensitive.
For the custom groups
or roles, the IDs cannot contain more than two characters, and cannot
contain spaces. For example, the following IDs can be used: a1,
b2, Ab, AB. The following IDs cannot be used: abc, A 1, a bc.
For
the Cognos 8 predefined groups, use the associated IDs
as documented the table above.
Specify a value for the id attribute for each
group element.
Tip: To find the ID in Cognos Connection,
open the group or role properties page and, on the General tab,
click the View the search path, ID and URL link.
The following example shows the syntax of the ui_groups parameter.
<param name="ui_groups">
	<group id="g1">xOm5ldyBncm91cHM6dWlHMV9lbg_</group>
	<group id="g2">xOm5ldyBncm91cHM6dWlfUjI_</group>
	<group id="55">xOf5ldyBnc4htcHM6dAlfUjI_</group>
</param>
Save the system.xml file.
Restart the Cognos 8 service.
Hide and Disable
the New URL Button
Hiding UI elements such as toolbar buttons allows you
to declutter the UI, but hiding alone will not disable the functionality
behind the UI element. For security reasons, if you want to hide the
new URL button, it is best to disable it. Doing so hides the button,
but more importantly, eliminates the possibility of someone adding
an undesirable URL.
Steps
Stop the Cognos 8 service.
Open the c8_location/templates/ps/portal/system.xml
file in an XML or text editor.
Add the following parameter:
<param name="disableURLObjectCreation">true</param>
Save the system.xml file.
Restart the Cognos 8 service.
The new URL toolbar button is removed, the URL field on the object
creation wizard is disabled, and all URL object creation requests
on the server handler will be ignored.
Limit the Number of Entries That Users Can Cut, Copy, and
Paste
You can limit the number of entries that users can cut,
copy, and paste to improve the performance of Cognos 8.
This allows you to control the storage space taken up by temporary entries
and reduce the time required to execute cut, copy, and paste requests.
For example, you can set the limit to 50 entries. If users cut,
copy, or paste more than 50 entries, they receive a maximum entries
message.
For more information about other tasks you can perform to improve
the performance of Cognos 8, see Tune Server Performance.
To change the limit, you must have access to the computer where
the report server is installed.
Steps
On each computer where Cognos 8 is installed,
open the c8_location/templates/ps/portal/system.xml file
in an editor.
Ensure that your editor supports saving files in UTF-8 format.
Find and edit the maxEditEntries parameter
as follows:
<param name="maxEditEntries">
	50
</param>
Save the system.xml file.
Stop and then restart the Cognos 8 service.
For more information about stopping Cognos 8, see the Installation and Configuration Guide.
Customizing Object
Actions
You can customize the actions available for package,
folder, URL, jobDefinition, query, report, reportView in Cognos
Connection.
For a list of actions that you can customize, you can look at
the c8_location/templates/ps/portal/system.xml file. Search
for "base-object-actions".
Remove an Action
To remove an action for a class of objects, such as
reports, in the Cognos Connection user interface, you must modify
the system.xml file. When you remove an action, users no longer have
access to it.
Steps
Stop the Cognos 8 service.
Open the c8_location/templates/ps/portal/system.xml
file in an XML or text editor.
Locate the following XML code that describes the actions
for the objects in Cognos Connection:
<param name="base-object-actions">
  <actions>
    ...
  </actions>
</param>
Remove the action
For example, the following XML code describes the actions for
reports:
<param name="base-object-actions">
  <actions>
    ...
    <object class="report">
      ...
      <action name="run_options"/>
      ...
    </object>
    ...
  </actions>
</param>
Remove the following line:
<action name="run_options"/>
The run options action is no longer available in Cognos Connection
for reports.
Save the file.
Start the Cognos 8 service.
Expose a Shortcut Action
A shortcut action gives users the ability to create
shortcuts to a class of objects. By default, shortcut actions appear
on the Cognos Connection actions page.
To add a shortcut action for a class of objects, such as reports,
to the Cognos Connection main page, you must modify the system.xml
file.
Steps
Stop the Cognos 8 service.
Open the c8_location/templates/ps/portal/system.xml
file in an XML or text editor.
Locate the following XML code that describes the actions
for the objects in Cognos Connection:
<param name="base-object-actions">
  <actions>
    ...
  </actions>
</param>
Add the following line of XML code to the actions for the
class of objects:
<action name="shortcut" visible="main"/>
For example, the following XML code includes a shortcut action
in the actions for folders:
<param name="base-object-actions">
  <actions>
    ...
    <object class="folder">
      <action name="shortcut" visible="main"/>
    </object>
    ...
  </actions>
</param>
Save the file.
Start the Cognos 8 service.
Add a Custom
Action
To add a custom action for package, folder, URL, jobDefinition,
query, report, or reportView objects in the Cognos Connection user
interface, you must modify the system.xml file. Add a custom action
when you want to run an SDK application for a particular class of
object, such as a report. You can pass the following properties
of an object to an application:
defaultName
defaultOutputFormat
searchPath
uri
permissions
usage
disabled
In the Cognos Connection main view, custom action icons appear
to the left of the More link. In the Perform an action dialog box,
custom actions appear under the Cognos-specified actions.
Steps
Stop the Cognos 8 service.
Open the c8_location/templates/ps/portal/system.xml
file in an XML or text editor.
Locate the following XML code that describes the actions
for the objects in Cognos Connection:
<param name="base-object-actions">
  <actions>
    ...
  </actions>
</param>
Use the following syntax to add a custom action as a child
of the <object> element for the class of object
you want to associate the custom action with. The <object> elements are
children of the <actions> element. Note that
an English tooltip and label are required.
<action name="name" type="custom">
  <icon>
    icon to show for this element
</icon>
  <url>
    http-encoded URL to execute
  </url>
  <label xml:lang="en">
    link text
  </label>
  <tooltip xml:lang="en">
    tooltip text
  </tooltip>
  <label xml:lang="language">
    link text
  </label>
  <tooltip xml:lang="language">
    tooltip text
  </tooltip>
  <objProperties encode="encoding">
    <property>
      property to be passed to application
    </property>
  </objProperties>
</action>
For example, the following XML code defines a custom action for
a report object that launches an ASP application named myapp. The defaultName and searchPath properties
of the report are passed to the application.
<param name="base-object-actions">
  <actions>
    ...
    <object class="report">
      ...
      <action name="showPath" type="custom">
        <icon>
          action_myaction.gif
        </icon>
        <url>
          /myapp.asp</url>
        <label xml:lang="en">
          View the search path
        </label>
        <tooltip xml:lang="en">
          View the search path
        </tooltip>
        <label xml:lang="fr">
          Afficher le chemin d'accès
        </label>
        <tooltip xml:lang="fr">
          Afficher le chemin d'accès
        </tooltip>
        <objProperties encode="shift_jis">
          <property>
            defaultName
          </property>
          <property>
            searchPath
          </property>
        </objProperties>
      </action>
    </object>
    ...
  </actions>
</param>
Save the file.
Start the Cognos 8 service.
Restrict
Content Browsing
By default, Cognos Connection users can browse public
folders starting at the root content folder (/content). You may
want to restrict the folders that users can browse. You can set
the root content folder that users can browse to any path for:
a given session, using the URL interface
all sessions, using a system setting in the system.xml file
This
setting does not apply to administrators.
Root Content Folder Changes
When you specify a root other than the root content folder, the
following changes occur:
Content navigation is restricted to the
root folder and its subfolders.
Search results are limited to objects that are contained in
the root folder and its subfolders.
The Location property in the Properties dialog box shows the
path beginning at the root folder.
The choice of destination folders when a consumer creates new
content is limited to the root folder and its subfolders.
Considerations
Specifying a root folder other than the root content folder does
not restrict administrative functions such as schedule management.
Restricting content browsing by specifying a new root folder
is not a means of enforcing security. Folder access must be controlled
using the Cognos 8 security model.
Steps Using a URL Command
Start Cognos 8.
Click in the Web address box and delete any path parameters
specified by &m_path.
If you do not remove these path parameters, they override the
root setting.
Type the following at the end of the URL:
&m_root=url-encoded search path
For example, if you want to restrict browsing to the Go Sales
package, while hiding the tab bar, toolbar and standard Cognos 8
header options, type the following:
&m_root=%2Fcontent%2Fpackage%5B%40name%3D’GO%20Sales’%5D&ui=m1h3m4.
Steps Using the System.xml File
Stop the Cognos 8 service.
Open the c8_location/templates/ps/portal/system.xml
file in an XML or text editor.
Modify the <param name="consumer-root"> line
in the following way:
<param name="consumer-root">search path</param>
For example, typing the following sets the root folder to a folder
named Folder1 in the package named Pack1.
<param name="consumer-root">
  /content/package[@name='Pack1']/folder[@name='Folder1']</param>
Save the file.
Start the Cognos 8 service.
Implementing a Custom Welcome
Page
You can create a custom Welcome page and configure Cognos
Connection to use this page instead of the default page provided
by Cognos 8.
The custom Welcome page can be any type of a browser page, such
as .html, .asp, or .jsp. To provide Welcome pages that are locale-
and style-sensitive, you must create a separate page for each language
and style .
When you create a custom Welcome page, you can reuse some elements
from the default Welcome page to make your job easier .
After the page is created, configure your Web server and your
application server to expose the new Welcome page , and
configure Cognos Connection to use it .
Reuse
Elements From the Default Welcome Page
There are elements in the Cognos 8 Welcome
page that may be difficult to implement, especially the logon link
and the links to different studios. To make your job easier, you
can reuse these elements from the default Welcome page. You can
create a page with any content that, through an iFrame, frame, and
so on, references the links-only section of the Welcome page.
The links-only page will look like this.
If you want to change the background color, modify the welcomeToolPanel parameter
in the default.css file associated with the style you are using.
For more information, see Example - Customize the Default Welcome Page.
Steps
In a text editor, such as Notepad, type the code for the
page using the following parameters in the page URL.
|
basewelcome | yes no | Renders the default Welcome page that contains
only the links. This parameter is mandatory. |
wtarget | top parent self (default) | Specifies where the links should appear
in the custom Welcome page. This parameter is optional. If
you want the links to appear in the same frame, do not include this
parameter. |
The following URL renders the links-only, default Welcome page:
http://localhost/cognos8/cgi-bin/cognos.cgi?b_action=cognosViewer&m=portal/welcome/welcome.xts&basewelcome=yes&wtarget=top
For example, if you want to create a custom Welcome page with
only one iFrame that uses the links-only page, the source code for
the page could be as follows:
<html>
<head></head>
<body>
<iframe width="100%" height="100%"
src="http://localhost/cognos8/cgi-bin/cognos.cgi?b_action=cognosViewer&m=portal/welcome/welcome.xts&basewelcome=yes&wtarget=top"/>
</body>
</html>
Save the file.
Create the Required
Directories
After the custom Welcome page is created, you must save
it in a directory that can be accessed by Cognos 8. We
recommend that you place your file in a directory that is separate
from your Cognos 8 installation.
If you create your page as a set of HTML pages, you can set up
a virtual directory for your custom Welcome page. For example, you
can create the my_welcome virtual directory in c8_location\my_welcome, where my_welcome is
the location of your custom Welcome page, and grant read permissions
for the directory.
After the virtual directory is set up, you can save the custom
Welcome page in it. If you create custom pages for different locales
and styles, you must create directories for each locale and style.
The directories must be named after the style and locale.
For example, if you want to provide a custom Welcome page for
the English, French, German, and Japanese locales for all the predefined
styles, you must create the following directory structure for each
of the en, fr, de, and ja locales, where my_welcome is the
virtual directory, and then copy the individual custom Welcome pages
into the proper directories.
my_welcome/locale/business
my_welcome/locale/classic
my_welcome/locale/contemporary
my_welcome/locale/corporate
my_welcome/locale/modern
my_welcome/locale/presentation
For more information about setting up virtual directories, see
the Installation and Configuration Guide.
Configure Cognos Connection to Use a Custom Welcome Page
You configure Cognos Connection to use a custom Welcome
page by adding the welcomeURLOverride parameter
to the system.xml file located in the c8_location/templates/ps/portal
directory.
The welcomeURLOverride parameter overrides the
default Welcome page URL. Depending on the location of the custom
Welcome page, the URL can be specified as a relative or absolute path.
Note: The path names are case sensitive on UNIX.
Locale and Style Considerations
If you want to implement a custom Welcome page that is style
and locale-sensitive, the page URL must use the exposed replacement
parameters for the locale and style. The parameters are %LOCALE% and %STYLE%.
When the URL is processed, %LOCALE% is replaced
by the product locale, and%STYLE% is replaced by
the user's currently selected style.
For example, if the product language is English and the style
is Corporate, the welcomeURLOverride parameter is as follows:
<param name=
"welcomeURLOverride">/cognos8/my_welcome/%LOCLAE%/%STYLE%/customwel.htm
<param>
When the URL is processed, the %LOCALE% parameter
is replaced with en, and the %STYLE% parameter
is replaced with Corporate. The URL for this example is as follows:
/cognos8/my_welcome/en/Corporate/customwel.htm
If the product locale were set to French and the style to Classic,
the URL would be as follows:
/cognos8/my_welcome/fr/Classic/customwel.htm
Steps
From the c8_location/templates/ps/portal directory,
open the system.xml file.
Add the welcomeURLOverride parameter to the file, where
customwel.htm is the custom Welcome page.
If you use a relative path, the syntax is:
<param name="welcomeURLOverride">/cognos8/customwel.htm
</param>
If you use an absolute path, the syntax is:
<param name="welcomeURLOverride">http://.../customwel.htm
</param>
If your Welcome page supports different locales and styles and
you use a relative path, the syntax is:
<param name="welcomeURLOverride">/cognos8/my_welcome/%LOCALE%/%STYLE%/customwel.htm
<param>
Save and close the system.xml file.
Refresh Cognos Connection.
Customize Report Output Formats in Cognos Connection and
Cognos Viewer
You can specify which formats are available for users
to view their reports. For example, you may want to prevent users
from exporting reports in Excel.
The report formats available to a user appear in the user preferences .
The report formats are controlled by the format element
of the reportFormats parameter in the system.xml
file located in the c8_location/templates/ps directory.
The format element has the following attributes:
|
id | Report output formats, such as HTML or PDF | Specifies the supported report format. This
attribute cannot be modified. |
browserHide | | Excludes Web browsers in which the report
format should be hidden from users. You can modify this attribute. |
downloadable | | Specifies the download support. You
can modify this attribute |
appMode | basic Refers to the
basic run options and preferences. adv Refers to the advanced run options and scheduling. rv Refers to the report viewing options.
| Specifies the Cognos 8 functions where
the report format must be supported. You can modify this attribute. |
extension | refers to extensions, such as xls | Optional attribute that specifies the file
extension of the output format. It is used to control download functionality. |
mime | refers to a mime value, such as application/vnd.ms-excel | Optional attribute that specifies the MIME
type. It is used to control download functionality. |
cafaction | | Specifies the Cognos Application Firewall
settings. This attribute cannot be modified. |
Note: Because the format element settings
can be used to control access to output formats, this setting can
affect how reports that were saved previously are accessed. For
example, if a report is saved in PDF format, users cannot view the
saved report if the administrator chooses to make the PDF format
unavailable.
The following example shows how to remove CSV format from the
list of available format options, for example, when setting personal
preferences or scheduling reports, while still allowing users access
to saved CSV output in the portal.
<format id="CSV" browserHide="" downloadable="true"
appMode="" extension="csv"/>
The following example shows how to hide the report output completely.
<!--<format id="CSV" browserHide=""
downloadable="true" appMode="" extension="csv"/> -->
Steps
Open the system.xml file in the c8_location/templates/ps
directory.
In the following code, remove or comment out the format element
associated with the report format you want to disable.
<param name="reportFormats">
<!-- Comments -->
	<format id="HTML" browserHide="" downloadable="false"
appMode="basic adv rv"/>
	<format id="XHTML" browserHide="" downloadable="false"
appMode="adv"/>
	<format id="HTMLFragment" browserHide="" downloadable="false" appMode="adv"/>
	<format id="PDF" browserHide="" downloadable="true"
appMode="basic adv rv" extension="pdf"/> -->
	<format id="spreadsheetML" browserHide="safari" downloadable="true"
appMode="basic adv rv" extension="xlsx"/>
	<format id="XLWA" browserHide="safari" downloadable="true" appMode="basic
adv rv" extension="xls" mime="application/vnd.ms-excel"/>
	<format id="singleXLS" browserHide="safari" downloadable="true"
appMode="basic adv rv" extension="xls"/>
	<format id="XLS" browserHide="safari moz other" downloadable="false"
appMode="basic adv rv" cafaction="true"/>
	<format id="CSV" browserHide="" downloadable="true"
appMode="basic adv rv" extension="csv"/>
	<format id="XML" browserHide="" downloadable="true"
appMode="basic adv rv" extension="xml"/>
</param>
The following example shows how to disable the PDF format:
<!-- <format id="PDF" browserHide=""
downloadable="true" appMode="basic adv rv"/> -->
The following example shows how to disable support for the CSV
format for advanced run options and scheduling by deleting the adv attribute:
<format id="CSV" browserHide="" downloadable="true"
appMode="basic rv"/>
Save the system.xml file.
Restart the Cognos 8 service.
Note that the configuration settings you specify in the
system.xml file apply only to the presentation services which includes
the portal, portal administration, and Cognos Viewer. The settings
do not apply to the report server.
Configure
the Document Lookup Table
The document format lookup table is used to look up
file extensions when downloading document objects. Most browsers
require file extensions to determine which program to use to open
the file. If the name of the file being downloaded does not end
with the expected extension, the portal will append one based on
the document lookup table, found in the system.xml file.
The following example shows the document format code:
<param name="documentFormats">
	<format extension="doc" id="application/vnd.coc-wd"/>
	<format extension="xls" id="application/vnd.coc-xl"/>
	<format extension="ppt" id="application/vnd.coc-pp"/>
	<format extension="xlsx" 	id="application/vnd.openxmlformats-officedocument.spreadsheet.sheet"/>
	<format extension="pptx" id="application/vnd.openxmlformats-officedocument.presentationml.presentation"/>
	<format extension="docx" id="application/vnd.openxmlformats-officedocument.wordprocessingml.document"/>
</param>