Multiuser Modeling
You can implement multiuser modeling in Framework Manager
by:
Branching and merging 
If
you use branching and merging to manage a multiuser project, each
user can modify the same objects in a project at the same time.
Each user has a copy of the entire project and can work on any part
of it. When the branches are merged back into the root project,
all conflicts between the root project and the branches are resolved.
Segmenting and linking
If you use segmenting and linking to manage
a multiuser project, each user can look at the same parts of a project
at the same time. However, you must ensure that each user modifies discrete
parts of the project. Use links to allow different users to refer
to a project at the same time as another user is working on it.
Using repository control
If you use repository control to manage
a multiuser project, each user must check out the project, make
their modifications, and then check the project back in. Only one
user at a time can modify the project.
Branching and Merging Projects
Branching and merging enables multiple users to work
on the same model at the same time. To do this, the project owner
creates a branch of the root project, which is a copy of the project. A
team member can modify the branch as required, independently of
the root project. Branches can be merged back into the root project
as required. Conflicts between the root project and a branch are
resolved during the merge process.
There is no limit to the number of branches you can create. You
can create a branch from a branch.
If you use a version control system for your project files, you
can also create a branch by checking out the most recent version
of the file.
Recommendations
for Branching and Merging
Use the following guidelines when branching a project:
Decide how you want to share the metadata
in your organization. For more information, see Methodologies for Branching.
Divide the project into logical pieces and branch the project
to create the logical pieces. For more information, see Ways to Branch a Project.
Communication between team members that are working on various
branches is very important. Before making a major change to your
branch, talk to the other team members to see how the change will
impact their branches. For example, adding objects to a branch will probably
not impact other team members but deleting an object that other
team members are using in their branches will create a conflict
when you merge your branch back into the root project.
Merge the branches in the reverse order that you created them
in. For example, Sean creates a branch from the root project. Susan
creates a branch from Sean's branch. When it is time to merge the
branches back into the root project, Susan first merges her branch
back into Sean's branch and then Sean merges his branch back into
the root project.
Merge branches back into the root project often, after making
a few changes to your branch, rather than making many changes and
merging only occasionally. This makes it easier to resolve conflicts
during the merge process. You can merge all branches back to the root
project and then branch the project again. Each team member receives
an updated version of the model.
If you want to branch a project that is under repository control,
do the following:
Create the root project
under repository control.
Branch the project.
Modify the branch project. Do not use repository commands.
Check out the root project.
Merge the branch back into the root project.
Check in the root project.
Methodologies for Branching
Before you branch a project, you must decide how you
want to share the metadata in your project. This section describes
some common methodologies for sharing metadata.
Hub and Spoke
In hub and spoke, a project uses common metadata that must be
shared by all functional areas. The root project consists of a fully
modeled physical layer containing the objects that all functional
areas require. The root project is branched for each functional
area. Each functional area can create its own branches if there
are multiple people working on it. At any time, a functional area
modeler can merge a branch back into the root project to update
the root project, and then branch again to receive updates. Objects
that are common to all functional areas are kept in the root project.
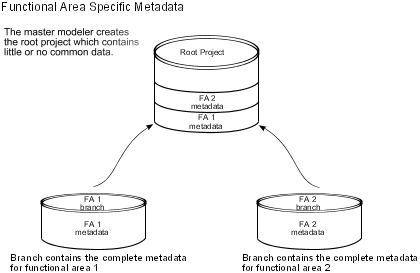
Functional
Area Specific Metadata
In functional area specific metadata, there is little or no common
metadata in the project. Each functional area develops their own
objects in the project independently. Each functional area is unaware
of the objects in the other functional areas. The master modeler
controls merging of the branches to prevent each functional area
from seeing objects in the other functional areas.
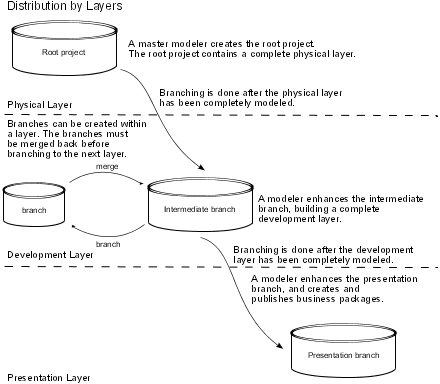
Distribution by Layers
In distribution by layers, the metadata is organized in layers.
Each layer requires access to the metadata of the layer above it.
For example, a model contains three layers. The top layer is the root
project, consisting of a fully modeled physical layer. The root
project is branched to create the second layer, the intermediate
branch. The intermediate branch contains a fully modeled development
layer. The intermediate branch is branched to create the third layer,
the presentation branch. The presentation branch contains a fully
modeled business layer where reporting packages are defined and
published.
Ways to Branch
a Project
Here are some ways to divide a project:
 | By task and skill set Create separate branches for one
person to work on star schemas and packages, one person to work
on calculations and filters, one person to work on dimensions, and
one person to work on queries and object naming. |
| | By model layers Create separate branches for the import layer,
the intermediate layer, and the presentation layer. |
| | By business unit or functional area Create separate branches
for sales and retailers. |
| | By type of data source Create separate branches for relational,
dimensional, and ERP data sources. |
Create a Branch
You can create a branch in a project.
You can also check out the most recent version of the
project file. For more information, see Check In and Check Out a Project.
Steps
Open the project from which you want to branch.
From the Project menu, click Branch
to.
In Project name box, type a name for
the project.
In the Location box, type the path
to the folder where you want to store the branched version.
Merge Projects
You can merge a branch back into its root project.
To merge a branch back into the root project, Framework Manager
shows a list of transactions that have been performed on the branch.
Beside each transaction is a check box. For each transaction that
has its check box selected, Framework Manager attempts to perform
the transaction on the project with which you are merging. If a
transaction is completed successfully, it is marked with a check
mark and the next transaction is attempted. If a transaction fails,
it is marked with an "X" and processing stops.
When a transaction fails, you may be able to correct the problem
immediately. For example, if an object is missing, Framework Manager
identifies the missing object and prompts you to replace it with
another object.
When you reach the end of the transaction list, you can accept
or cancel the changes. If you accept the changes, the transactions
that were successful are removed from the transaction list. If you
do not accept the changes, the transaction list is not updated and
you can perform the same merge again at a later time.
Some conflicts cannot be resolved during the merge process or
there may be more than one transaction related to a failed transaction.
In these situations, you can skip the transactions by selecting
the Uncheck dependent transactions check box.
Framework Manager then clears the check box for each transaction
related to the failed transaction. When Framework Manager resumes
running the transaction list, it does not run the transactions if
their check boxes are cleared. When you reach the end of the transaction
list, you can accept the changes to that point, troubleshoot the
transactions that were skipped, fix the error, and then perform
the merge again. When you perform the merge again, the transaction
list contains only the transactions that were not performed.
Note: Before the transaction list is run, Framework
Manager makes a backup of the merging project. The backup is stored
in the same directory as the merging project.
Steps
Open the project into which you want to merge a branch.
From the Project menu, click Merge
from.
Locate and click the .cpf file for the branch to be merged.
Click Open.
The Perform the Merge window opens, showing
a list of transactions. The transactions that you selected are run.
Choose how to run the transactions:
To run the entire transaction list continuously
from start to finish, click Run.
To run one transaction and then pause, click Step.
When a transaction is completed, a check mark or an "X" appears
beside it. A check mark indicates that the transaction was applied
successfully to the model you are merging into. An "X" means that
the transaction failed. Detailed information for each transaction
is listed under Transaction Details. If a transaction
fails, the merge process pauses.
Choose one of the following:
|
Fix a failed transaction | See Fixing Failed Transactions. |
| Skip the current transaction and run the one
after it | Click Skip. |
| Run the current transaction and pause | Click Step. |
| Run the transaction list from the current transaction
to the end | Click Continue. |
| Accept transactions run to this point and return
to the project page | Click Accept. |
| Cancel all transactions run to this point and return
to the project page | Click Revert. |
Perform the previous step until you reach the end of the
transaction list or you have accepted or reverted the changes.
If you accepted the changes, they appear in the Project
Viewer. If you reverted the changes, none of the changes
appear.
If you accepted the changes, save the merged project in
the project page. If you decide not to save the changes, close the
project without saving it.
Note: If you accept the changes in the Perform
the Merge window but do not save the project you can
never perform the same merge again. After you accept transactions
they are removed from the transaction list.
Fixing Failed Transactions
During the merge process, transactions may fail. You
can fix most transactions by substituting one object for another.
You can fix all transactions by modifying the project.
Case 1:
An object used in the branch project is not in the
root project. In the Merge dialog box, you see
the Replace box indicating the name of the
object that is missing from the root project.
To resolve this problem, you need to select an alternative
object from the root project. Do the following:
From the Project Viewer or Diagram,
select the name of the object to use in place of the missing object.
In the Merge dialog box, the object appears
in the Replacement Field.
Click Replace.
The transaction runs again, substituting your replacement object
for the missing object.
For more complex problems, you may be prompted to select the
object that cannot be found in the root project from the Object
Naming Conflict Resolution dialog box.
If a warning appears, you are unable to resolve the problem using
this dialog box. Instead, do one of the following:
modify the root project
skip the transaction
Case
2:
For all failed transactions, you can resolve the problem by modifying
the root project.
To modify a root project, do the following:
Modify the model as required.
From the Perform the Merge dialog
box, click Continue to run the entire transaction
list starting from the failed transaction.
Case
3:
You are unable to fix the transaction.
To resolve this problem, do the following:
Click Skip to skip the next
transaction.
Clear the check box for the failed transaction.
Ensure the Uncheck dependent transactions check
box is selected.
From the Perform the Merge dialog
box, click Continue.
Segmenting and Linking Projects
You can use Framework Manager to create and link segments,
projects, and folders. A segment is a project within a main project.
A segment is owned by its main project. A link is a shortcut to an
existing project. The project that is linked can be shared by multiple
projects.
A project segment is a complete project and changes to that project
impact all projects to which it is linked. If you want to open a
segment as a separate project, it must be structured as a complete
project. There must be a physical layer in each segment that contains
a subset of the data source query subjects on which they are based.
These data source query subjects provide access to the data and
metadata and must be included in the appropriate segments.
Do not change the physical layer in a segment. Any change
will be reflected in the linked parent model and will impact all
model segments that share data source query subjects. Changes may
not be apparent outside the model in which they are made until the
model is closed and reopened.
Before a project is segmented, ensure that the folder and namespace
are named correctly. You cannot rename the folder or namespace after
it has been segmented.
Changes made in the root model, such as upgrading and setting
object security, are not inherited by the segmented model. You have
to apply the changes to each segment of the model.
The main project has access to the entire model, including the
segments. You can make changes to the segments when working in the
main project, however, if the segment is being accessed by more
than one user, the potential exists for updates to be lost.
Note: When changing the project structure, do not open
the segments as individual projects. We recommend that you check
out the main project and make changes from within it.
You can link the segments to other projects that contain related information
to maintain consistency and reuse information. If you plan to link
model segments, follow the recommendations for segmenting projects.
We recommend that you link to relatively complete segments and regularly
verify your model .
Recommendations for Segmenting
Projects
Understanding project segmentation is critical to ensure stability
and minimize complexity in a multiuser modeling environment. If
you intend to segment your project, we recommend that you do the
following:
| | Model the physical layer as completely as possible by: ensuring that the namespace in the main
project and any links in the project to folders have the same identifier For
example, you have a main project and a link in the project to a
folder. The folder you link to must exist in a namespace that has
the same name as the main project. If the identifier in the main
project and that of the linked folder are not the same, any relationships,
shortcuts, or expressions that reference objects in the link, from
the main project, may not work. ensuring all objects in a project have unique identifiers For
example, you have a main project that contains a query subject named
NewQS, and a segment in the project. You open the segment, add a
new query subject named NewQS, and save the segment. When you open
the main project, an error occurs because a query subject named
NewQS already exists in the main project. updating references in both the main project and segments in
the project For example, you have a main project and a segment
in the project. In the main project, you have a relationship named
qs1_qs2 that exists between query subject1 and query subject2. The
query subject named query subject 2 is in the segment. You open
the segment, rename query subject2 to query subject3, and save the
segment. When you open the main project, an error occurs because
the relationship qs1_qs2 is broken. In Framework Manager, any object
that relies on a reference, such as shortcuts, model query subjects,
and expressions are also affected. ensuring that the main project and any segments in the project
have the same languages For example, you have a main project and
a segment in the project. In the segment, you defined the languages
English and French. You open the main project, add the language Chinese,
and save the segment. When you open the segment, an error occurs
because the language Chinese is not defined in the segment.
|
| | Organize the physical layer using namespaces. You should
create a namespace for query subjects, calculations, and filters
that you expect to be necessary for more than one segment. You
should create a namespace for each collection of query subjects
that is unique to a planned model segment. |
| | Accept the default project name when creating the segmented
project. The segmented project must be created in a sub-folder
within the master project folder. The default project name is the
same as the folder or namespace that contains it. |
| | Segment the model for each namespace you created. |
| | Use a source control repository when possible to restrict access and track
changes to your projects and segments. |
Limitations of Segmenting and Linking Projects
The following limitations apply to segmenting and linking
projects:
You cannot test objects in a segment or
linked project if they refer to objects that exist in an unavailable
segment.
You cannot create new objects in a segment or linked project
if they refer to objects that exist in an unavailable segment.
When you link to a project, all referenced objects (namespace
objects, data sources, and parameter maps) are linked. Packages
are not linked.
Changes
that you make to a child segment are not reflected in the main project,
even after doing a refresh (F5). This happens because another child
segment linked to the parent or the main project itself is open.
Close all child segment projects and then reopen the main project.
The point at which
you create a segment in a project determines the point at which
you can see the segment. If you create a nested segment from the
main project, you can see the nested segment from the main project.
If you open the segment containing the nested segment as a standalone
project, you cannot see the nested segment. If you create a nested segment
from a segment opened as a standalone project, you can see the nested
segment from the standalone project. If you open the main project,
you cannot see the nested segment created from the standalone segmented
project.
Create a Segment
With segments, you can organize a project according
to business rules and organizational requirements, and share and
reuse project information.
You create segments at the folder level or the namespace level.
You can create a new project in a new folder, complete with its
own associated project files.
When a new segment is created, existing parameter maps from the
main project are copied to the new segment. After the segment is
created, parameter maps are unique to each segment and cannot be
shared between segments. For example, if you are working in the
main project, you can use a parameter map in a query subject belonging
to a segment. However, if you open the segment, the parameter map
is not available.
You can access a segment only from the project in which it was
created. For example, you open the main project and create a segment
(Segment A). Then you create another segment (Segment B) inside
Segment A. From the main project, you can see Segment A and Segment
B. However, if you open Segment A by itself, you do not see Segment
B.
Before you create segments, consider dividing your project into
business units. For example, you have a project named Sales. You
can create two folders, one named Products and the other named Orders.
You can divide the Sales project at the Products folder and at the
Orders folder.
Steps
Click the folder or namespace you want to divide, and from
the Project menu, click Create Segment.
We recommend that you accept the default settings for the project
name.
To rename the segment, in the Project Name box,
type a different name.
This does not change the folder name. If you want to rename the
folder, you should rename it in Project Viewer before
creating the segment.
For ease of use, we recommend keeping the same name for both
the folder and the segment.
To add the segment to a source control repository, do the
following:
Click Repository.
In the Repository Settings pane, select
the Add to Repository check box. In the Connection list,
choose either to use an existing connection, or configure a new repository
connection .
Click OK.
The Project Viewer is refreshed and the
icons representing the segmented folder or the segmented namespace
are shown.
Create a Link
You create links to help organize work across large
projects, to maintain consistency, and to reuse information.
For example, the project named Inventory contains the folder
named Products. You can create a link from the Sales Products to
Inventory Products. If any changes or additions are made to the
Inventory Products folder, you will see them in the Sales Products
folder.
If you plan to link model segments, ensure that you follow the
recommendations for model segmentation .
A linked project is shared by other projects. It
should not be created in a sub-directory within the master project
directory.
You must create the project, folder, or namespace before
you can link to it.
The projects you link must have and the same design language
the same languages defined.
Steps
In the Project Viewer, click the project,
segment, namespace, or folder that you want to link to.
Tip: You can create links only to folders, namespaces,
projects, or segments.
From the Project menu, click Link
Segment.
Locate and click the .cpf file of the project that contains
the object that you want to link to.
Click Open.
If the project you selected requires upgrading,
you are prompted. For more information, see Upgrading Models.
If the project or repository connection uses a mapped drive
letter, you are prompted to keep the mapped drive letter or to change
it to a UNC path.
You must choose the UNC path if your project
will be shared by others.
Choose the project, segment, namespace, or folder to link
to:
To link to another project, click Add
Project, locate the .cpf file and click Open. Select
the project and click Add.
To link to a segment, click the segment and click Add.
Click OK.
A new folder appears in the Project Viewer.
Leverage
a Read-Only Project
You can make a read-only project available for other
developers to leverage while protecting the project from unwanted
changes.
Steps
Create a share that will host the project that is to be
protected.
Give read-only access to that share for any developer leveraging
the project.
Note: Changing the file properties of the project to read-only
will not do the same thing.
Repository Control
Use repository control to help manage your projects
in Framework Manager. You control versions of a project to ensure
that each version of a file is recoverable. Repository control also ensures
that users in a large organization have access to the most recent
changes or versions of a project or segment.
You can use Framework Manager to:
create a connection to a Visual SourceSafe
(VSS) or Concurrent Versions System (CVS) repository
add a new project to a repository
add an existing project to a repository
create a local project from a repository
After your repository has been set up and projects have been
added, you can use Framework Manager to:
We do not recommend synchronizing projects that are connected
to repositories. For more information, see Synchronize Projects.
Note: The limitations set by the third party repositories
are incorporated into Framework Manager. For more information, see
the vendor documentation for the third party data source.
Creating Repository Connections
You can use one of these repositories to manage file
versions in Framework Manager:
In Framework Manager, you can add a project, segment, link, or
namespace to one of the supported repositories.
In a multiuser environment, each user needs a Visual SourceSafe
(VSS) client installed on their machine.
You can view a list of repositories currently supported by Cognos
products on the Cognos support site (http://support.cognos.com).
For information about installing and configuring these repositories,
see the documentation provided by the vendors.
You must set up the path to the source control system in Cognos
Configuration before you create a repository connection in Framework
Manager. For more information, see the Cognos 8 Installation
and Configuration User Guide.
Create a Repository Using Visual SourceSafe
If you use Visual SourceSafe as your repository, connect
to it using your Windows user name and password. When you open a
project stored in Visual SourceSafe, you can automatically log on
using your Windows user name and password.
Steps
Start Visual SourceSafe Administrator.
From the Tools menu, click Create
Database.
Specify where you want to create the database.
Select the New 6.0 Database Format check
box, and click OK to create the database.
From the Users menu, click Open
SourceSafe Database.
Locate the srcsafe.ini file, and click Open.
You can choose to change the database name. Click OK.
Click the database you just created, and click Open.
A list of the users assigned to the database appears.
Ensure that a user with the same credentials as your Windows
account exists.
Tip: To add a user, from the User menu, click Add User
and enter the credentials of your Windows account.
From the Tools menu, click Options,
and on the General tab, select the Use network
name for automatic user log in check box.
Close Visual SourceSafe Administrator.
Using a text editor, open the srcsafe.ini file, and type
the following command at the end of the file:
Update_No_Change=Update
This command ensures that the project is updated each time there
is a check in.
Save the srcsafe.ini file and close the editor.
Start Framework Manager and, from the Welcome page,
click Repository, Connection Manager.
If you have Framework Manager open, from the Repository menu,
click Connection Manager.
Click New.
In the Connection Name box, type a
name for the connection.
In the Type list box, click SourceSafe://.
In the Settings window, click in the Value pane,
and browse to the location of the srcsafe.ini file.
Note: Do not include the filename of the srcsafe.ini filename
in the location.
Click Test.
If you specified your path using a drive letter, you are prompted
to replace it with a network (UNC) path. This is recommended if
the repository is to be shared with other computers.
Click OK.
Create a Repository Using CVS
You can use Concurrent Versions System (CVS) as a Framework
Manager repository.
The CVS executable program is configured using the CogConfig
utility. A user may maintain their own copy of the CVS executable,
or share a common copy accessible by all.
Note: If you are protecting a project for other developers
to leverage but not change, ensure that project resides in a separate
repository with permissions for that share set appropriately.
Steps
Create a directory for the CVS repository.
An example is C:\cvs_repository.
Create a subdirectory named CVSROOT.
An example is C:\cvs_repository\CVSROOT.
To support a multiuser environment, do the following:
Right-click the folder containing the CVSROOT
directory that is to be shared, and click Sharing and
Security.
In the Security tab, you must have
a group that includes all users. You can add each user individually.
In the Sharing tab, set the permissions
to Full Control. All users must be assigned Full Control.
Start Framework Manager and, from the Welcome page,
click Repository, Connection Manager.
If you have Framework Manager open, from the Repository menu,
click Connection Manager.
Click New.
In the Connection Name box, type a
name for the connection.
In the Type list box, click CVS://.
In the Settings window, click in the
Value pane, and browse to the location of the repository.
Do not specify the CVSROOT in the path. The repository location
must be different from the location where the new project is stored.
An example is C:\cvs_repository.
Click Test.
If you specified your path using a drive letter, you are prompted
to replace it with a network (UNC) path. This is recommended if
the repository is to be shared with other computers. Press Yes to
use the UNC path, or press No to keep the drive
letter.
Click OK.
Working
With Repository Connections
Repositories help to maintain stability and minimize
complexity in a multiuser environment, while ensuring that each
file is recoverable. After you have created the connection to your repository ,
you can do any of the following:
Add a new project to a repository .
Add an existing project to a repository .
Create a local project from a repository .
Check projects in and out of the repository .
Get the latest version of a project .
View the history and restore an object to a previous version .
Segmented projects deserve special consideration when used with
repositories. For more information, see Using Repositories With Segmented Projects.
Add a
New Project to a Repository
You can add a new project to a repository at the time
it is created. For information about creating a new project and
adding it to a repository, see Create a Project.
Add an Existing Project to a Repository
You can add an existing project to a repository.
You must be connected to a repository before you can add a project.
For information about connecting to a new repository, see Creating Repository Connections.
Steps
In the Project Viewer, click the project
that you want to add.
From the Repository menu, click Add
Project to Repository.
In the Connection list box, select
the repository connection.
In the Location in Repository list
box, select a location to add the project and click Select.
To keep the project checked out from the repository, select
the Keep checked out check box.
Click OK.
Create a Local Project
From a Repository
If you want to use a project that is connected to a
repository as the starting point for a new project, you can create
a local project from a repository project.
A local project should be created only once. After the project
is created, you can pick up changes to the project by getting the
latest version .
If the original project is checked in to the repository or if
it is checked out by you, the new local project is created and checked
out of the repository.
If the project is checked out of the repository by someone else,
the new local project is created but it is not connected to the
repository.
Ensure that the project does not exist on your computer before
creating the local project.
Steps
From the File menu, click Open.
Click Repository.
Select the repository connection and the project file in
the repository.
Select a directory in which to save the new project.
Do one of the following:
Select the check box to create a local
copy of the project and connect it to the repository. If the project
is checked out by another user, you are prompted to open the project
as a copy.
Clear the check box to create a copy of the project on your
computer that is not connected to a repository.
Click OK.
The project is created and a copy of the project is placed
on your computer. Before making changes to the local copy, you should
ensure that the project is checked out of the repository.
Check In and Check Out a Project
You can also check your project in and out of one of
the supported repositories.
You must already have done the following:
Set up the source control system in
Cognos Configuration.
For more information, see the Cognos 8
Installation and Configuration User Guide.
Created a repository connection .
Either created a new project or opened an existing project,
and added the project to a repository.
When you check in a project, the main project file (.cpf), the
supporting XML files, and the action log files are checked in. For
more information about project files, see Objects You Will Use.
For information about installing and configuring third party
repositories, see the vendor documentation.
If you have a project checked in to a repository and you make
a change, you are notified that you must check out the project or
segment before you can make the change.
Steps to Check In a Project
In the Project Viewer, click the project
or segment you want to check in.
From the Repository menu, click Check
In.
Tip: To keep your project or segment checked out, select
the Keep Checked Out check box.
In the Description box, add a description.
Click OK.
Steps to Check Out a Project
In the Project Viewer, click the project
or segment you want to check out.
From the Repository menu, click Check
Out.
The icon for the project or segment reflects that the object
is checked out.
Steps to Undo Check Out
Click the project or segment for which you want to undo
the check out.
From the Repository menu, click Undo
Check Out.
You see a warning message about overwriting any edits made to
the project.
Click OK.
Get the Latest Version
When you use repository control in Framework Manager,
you retrieve the most recent version of the project (.cpf), model.xml,
customdata.xml, and log files. For more information about project
files, see The Project Page.
In the Project Viewer, an exclamation mark
shown next to a project or segment indicates that the segment is
out of date. A segment may be out of date because you synchronized
to a previous version or another user checked the project or segment
into the repository.
Steps
To see which segments are out of date, click Refresh from
the View menu.
Click the project or segment you want.
From the Repository menu, click Get
Latest Version.
Click OK.
View History
Every project or segment that is connected to a repository
has a detailed record of its history. You can see version information,
comments, and details about the history of the project.
The revision history of a project or segment is logged in the
repository.xml file. This file is located in the project folder.
Note: We recommend that you do not make changes to
a segment that is opened as a separate project. When a segment is
opened as a separate project, changes will not appear in the revision
history for the main project. If you must make changes to a segment
that is opened as a separate project, ensure that the main project
and all additional segments are checked in.
You can also return the project or segment to a previous version.
Any changes or edits made to the project since the last check in
are lost.
Segmented and Linked Models
Linked projects are
not impacted by actions performed on the main project or its segments.
You must open the linked project as a separate project and perform
repository actions directly on it.
If you are using the revision history with segmented or linked
models, do the following:
Always select the main project in the Project
Viewer before clicking View History.
Ensure that all segments are checked out of the repository before
reverting to a previous version. After reverting to the previous
version, check all segments back into the repository, starting with
the lowest level and working back toward the main project.
Note:
You can revert to a previous version when the segments are checked
in, but you will not be able to check out the segments to make further
changes.
Do not sync to a segment version that had a segment created
in it. It is better to sync to the root version that was checked
in after the segment was created.
You may receive warnings that
some segments could not be found. If you accept these warnings,
your project will not contain these segments. They can be restored
by syncing to a later version.
Do not delete a segment and then create a new one with the same
name. This may break the revision history.
Steps
Click the object that you want to view.
From the Repository menu, click View
History.
If you want to return the object to a previous version,
click the row of the version you want, and click Sync.
Click Close.
When you revert to a previous version, segments that
were created after the restored version are not deleted from your
computer. They are simply disconnected from the main project.
Using Repositories With
Segmented Projects
When you work with repositories containing segmented
projects , there are some things you should consider.
Segments do not need to be connected to the same repository as
the main project. When you create a segment, you can choose to add
the segment to an existing repository or you can add it to a different
repository.
If you have a project or segment checked into a repository and
you make a change, you are notified that you must check out the
project or segment before you can make the change. If you make changes
in a segment, you are notified in the main project that changes
were made to the project segment.
Creating a Segmented Project to be Used With a Repository
Segmented projects that are intended to be used with
a repository should be created in the following way. Ensure that
you follow the recommendations for model segmentation .
Adding a Previously Segmented Project to a Repository
Follow this process to ensure stability when adding
a segmented project to a repository. Ensure that you follow the
recommendations for model segmentation .
| | Add the main project to the repository and
keep it checked out. |
| | Add the segments to the repository , starting with the main project and working
out to the lowest level. |
| | Check the lowest level segment into the repository , and continue
checking in each successive main project until the main project
is checked in. The segment structure is not saved until main project
is checked into the repository. |
Remove a Segmented Project From a Repository
Follow this process to ensure stability when removing
segmented projects from a repository. Ensure that you follow the
recommendations for model segmentation .
| | Check out the main project from the repository . This
ensures that projects can only be modified by one user at a time. |
| | If there is more than one segment level, check out the main
project containing the segment to be removed. |
| | Delete the segment . |
| | Check in each successive main project until the main project
is checked in . The segment structure is not saved until
the main project is checked into the repository. |
| | All users should get the latest revision after the main
project has been checked in. |
Working With Segments in Multiuser Modeling
Consider the following when working with segmented projects
in a multiuser project:
Only a single user should change the segment
structure by adding or removing segments. When changing the structure
of the project, you should always check out the main project.
When working with a segmented project, check out only the segment
you are working with. The main project does not need to be checked
out but you should open the main project and work with the segments
from within it.
When checking a segment into the repository, include a concise
comment that starts with the name of the segment. This will make
the revision history easier to understand.
When a segment has been checked into the repository, the main
project will be shown with an exclamation mark indicating that it
is out of date.
Tip: To see which segments are out of date,
click Refresh from the View menu.
Checking out a project that is out of date, or using the Undo
Checkout action, requires that all child segments be
updated.
You may receive a message indicating that changes in
the child segments will be lost. You must check in any modified
child segments before checking out the project or using the Undo
Checkout action.
Branching a Project that is Under Repository Control
For information about how to branch a project that is
under repository control, see Branching and Merging Projects.
Using
External Repository Control
You can use Framework Manager with an external source
control system without using the repository features provided by
Framework Manager. This procedure explains how to put the Framework
Manager project files into an external repository. You can work
on the project in Framework Manager and the external repository
can manage the version control of the project files.
To use an external source control system, do the following:
| | Ensure that the project is closed. |
| | Delete the repository.xml file, if it exists. |
| | Add all the files that exist in the project directory to
the external repository. Tip: The project directory is the directory that contains
the <project name>.cpf file. |
| | Check the project files out of the external repository. |
| | Work on the project in Framework Manager. |
| | Save your changes. |
| | Check the project files into the external repository. |
Segment a Project
You can create a segment for a project that is stored
in an external repository. The segments are project directories
that are stored under the main project directory. Maintain the same hierarchy
in the repository as in the project directory.
The segments can be opened individually as stand-alone projects.
A segment can also be opened as part of the main project. In
this situation, you must check out the project for each segment
that you want to modify.